


If you're renovating in Beeston right now, your house probably feels smaller by the day. The sofa is shoved against a wall under a dust sheet. Boxes are balanced in the hallway. The spare room has become a dumping ground for lamps, books, tools, and the contents of at least one cupboard you forgot existed. Even a straightforward job starts to feel chaotic when you're living around your own belongings.
That's why storage for house renovations in Beeston works best when you treat it as part of the renovation plan, not an afterthought. A good storage setup clears working space, protects furniture and keeps the job moving. A poor one leaves you paying for space you can't use properly, or worse, digging through stacked boxes just to find the kettle.
Surviving the Renovation A Beeston Homeowners Story
A typical Beeston renovation often starts with good intentions. A couple decides to update the kitchen in a Victorian terrace or rework the layout in a semi. They think they'll “just move a few things into the dining room” for a few weeks. Then the old units come out, the dust starts spreading, and suddenly every clear surface in the house is carrying something that used to live elsewhere.

By the second week, the problem usually isn't the building work itself. It's the clutter around it. Dining chairs get moved three times. A sideboard ends up in the lounge. The coffee machine disappears into a random box. Someone leans a mirror in the wrong place and spends the rest of the day worrying it'll get knocked over.
That's the point where storage stops being a luxury and starts being a practical tool.
What changes when belongings leave the house
Once the non-essential items are out, trades have room to work properly. You can walk through the house without weaving around furniture. Fragile or sentimental things aren't sitting in a room that's about to be stripped back. The house feels less like a warehouse and more like a project under control.
Practical rule: If an item won't be used during the works and could be damaged by dust, knocks or repeated moving, get it out before the first tool comes out.
This isn't unusual. In the UK, self-storage demand is strongly driven by life events such as house moves, downsizing and renovations, and a substantial share of bookings are tied to property refurbishment, with many households using short-term rentals of around 8 months on average for these projects, according to Storeganise's review of self-storage trends.
The real benefit is breathing room
The biggest win is usually mental, not just physical. When the rooms being worked on are clear, decisions get easier. Cleaners can get in. Fitters can move materials safely. You stop making rushed choices because the house feels overstuffed.
For most households, the best storage plan isn't “put everything away”. It's “store the right things at the right stage”. That's where most generic advice falls short, and it's where a phased plan makes renovation life much easier.
Create Your Renovation Storage Timeline
Renovations typically require a sequence of storage moves, not just one. This is particularly the case when projects shift from strip-out to fitting to decorating, often while parts of the house remain in use.
There's limited public guidance specific to how homeowners in Beeston manage different stages of a renovation. Many local providers treat renovating as one broad use case, but don't really address how households should plan across a 3 to 6 month renovation, including access patterns, insurance, and what belongs on-site versus in storage, as noted on Orange Box Self Storage's personal storage page.
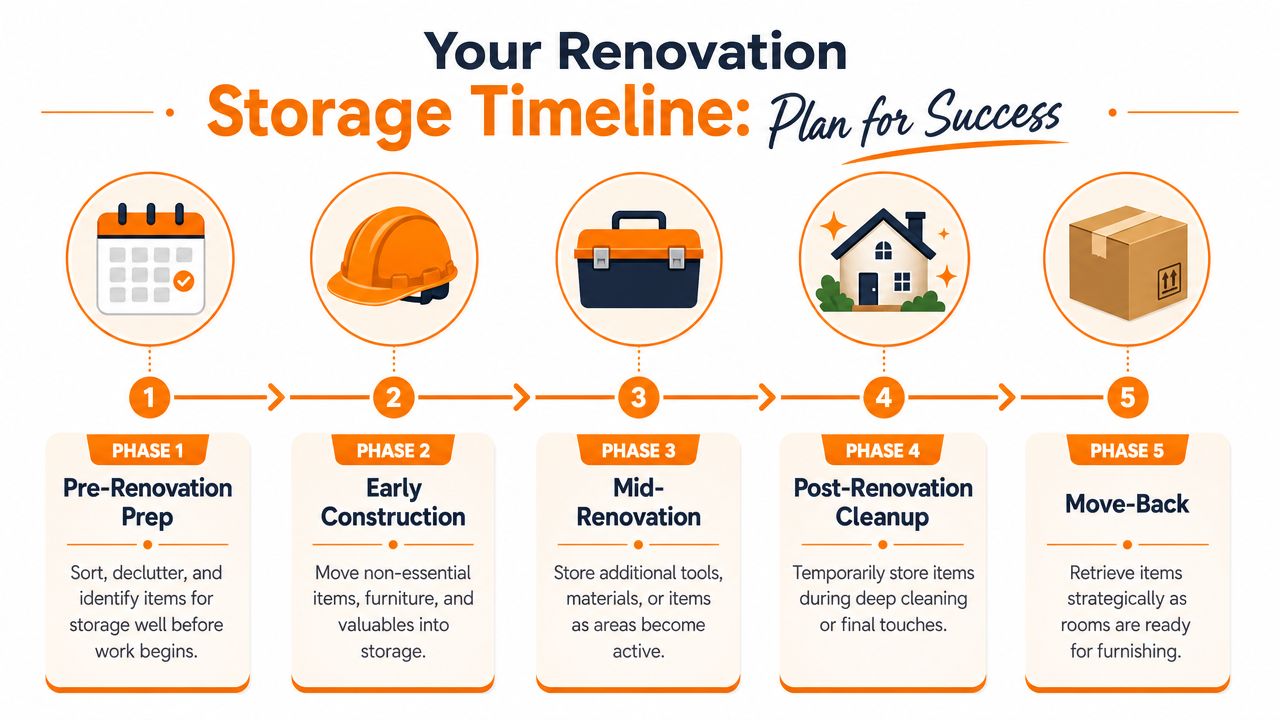
Phase 1 Pre-renovation prep
Start before work begins, not the night before demolition.
Walk room by room and sort items into three groups:
- Keep on site for daily living, such as current clothes, basic cookware, chargers, medication, and documents
- Store off site for furniture, seasonal items, books, ornaments, spare appliances, rugs, and anything vulnerable
- Dispose or donate for things you already know you won't want back after the renovation
If you're still refining schedules and contractor dates, it helps to look at broader advice on planning your house renovation. The principles are universal. Good planning reduces rushed decisions later.
Phase 2 Demolition and major works
This is the stage where people underestimate risk. Dust gets everywhere. Doorways become pinch points. Materials are carried through rooms that weren't meant to become part of the work zone.
For this stage, remove:
- Fragile pieces like mirrors, lamps, ceramics, framed art and electronics
- Large furniture near access routes including sideboards, dining tables, occasional chairs and shelving
- Soft furnishings such as curtains, rugs and upholstered benches that trap dust easily
If the renovation affects one main room, clear more than that room. Clear the route to it. A new kitchen doesn't just affect the kitchen. It affects the hallway, the back door route, the utility area, and often the dining room too.
Leave yourself a liveable core. One calm room with just the essentials can make the whole renovation feel manageable.
Phase 3 Fitting and installation
Once the noisy work eases off, the temptation is to bring everything back at once. Don't.
The fitting stage often needs temporary flexibility. Flooring may still be curing. Decorators may still need space. Kitchen fitters may want clear walls and corners while they finish details. Keep stored items out until each room is fully usable, not just nearly done.
A simple retrieval order works well:
- Daily essentials first such as cookware, bedding, work-from-home gear
- Functional furniture next like tables, storage units, and chairs
- Decor and low-priority items last once dust has settled and snagging is finished
Phase 4 Decorating and move-back
This final stage benefits from restraint. Bring back one room at a time. If the bedroom is finished, furnish the bedroom. Don't clog the landing with boxes for the lounge just because you're eager to empty the unit.
That phased return is what turns storage from a one-off rental into part of the renovation workflow. It keeps the house usable while the last details are finished properly.
Choose the Right Storage Unit Size for Your Project
Unit size is where renovation plans often go wrong. A room can look half empty once boxes are packed, then turn into a tight, awkward stack the moment wardrobes, chairs, and small appliances are added. For renovation work in Beeston, I advise sizing the unit around each phase of the job, not just the total volume of belongings.
That matters because what leaves the house during demolition is not always the same as what stays off-site during fitting and decorating. Kitchen projects are a good example. At first, you may only want cupboard contents, the table, and a few fragile items out of the way. Later, if dust spreads or trades need more working room, extra furniture often has to come out quickly.
Start with the renovation stage, then the room
A bathroom refit usually needs less space than a kitchen or lounge project, but the stage of the work changes the amount of storage you need. Demolition creates sudden clearance needs. Fitting needs access to certain items without bringing everything back. Decorating often calls for a little overflow space until paint, flooring, or snagging is finished.
| Renovation Project | Typical Contents | Recommended Unit Size |
|---|---|---|
| Bathroom refit | Linen, toiletries, cabinet contents, small furniture, wall mirror | Small locker or compact unit |
| Single bedroom redecoration | Bedside tables, clothes, soft furnishings, books, boxed personal items | Small to mid-size unit |
| Full kitchen renovation | Table and chairs, small appliances, cupboard contents, pantry stock, occasional furniture | Mid-size unit |
| Lounge renovation | Sofa, coffee table, media unit, rugs, lamps, artwork, boxed accessories | Mid-size to larger unit |
| Loft conversion | Stored loft contents, spare furniture, archived household items, seasonal belongings | Mid-size to larger unit |
| Multi-room renovation | Combined furniture, boxed possessions, overflow household contents | Larger unit |
A practical rule helps. If the works affect one main room, allow for that room plus the spaces that feed into it, such as the hallway, landing, dining area, or box room where displaced items tend to land.
Leave working space inside the unit
A unit should hold your belongings and still let you get to them. If you pack wall to wall and floor to ceiling, every retrieval becomes a reshuffle. That is manageable for a weekend move. It is frustrating during a six week renovation.
Leave enough room for a narrow access path and for taller items to stand safely without being crushed by loose boxes. If you want a clearer visual benchmark before booking, use a storage unit size guide for furniture, box counts and room contents.
What usually works in practice
For a single-room project, a slightly larger unit often saves money in the long run because it cuts rehandling, breakage risk, and wasted time. For two-room or whole-floor works, book for the largest likely phase, not the neatest early phase.
I have seen plenty of households start with a compact unit, then need to upgrade once the skip arrives and the trades ask for clearer access. It is easier to plan properly from the start.
If you want a useful outside example of how removal and storage planning overlaps on larger jobs, Perth removals and storage shows the same principle. Space has to match the workflow, not just the inventory.
The right unit is one you can organise by stage, reach into without unloading half of it, and keep using until the final room is finished.
Pack Like a Pro to Prevent Damage
Good packing during a renovation is about access as much as protection. You are not boxing things up for one clean move and one clean unpack. You are storing them through changing stages of work, which means some items need to stay buried for weeks, while others need to come back out the moment demolition ends or the decorators finish.
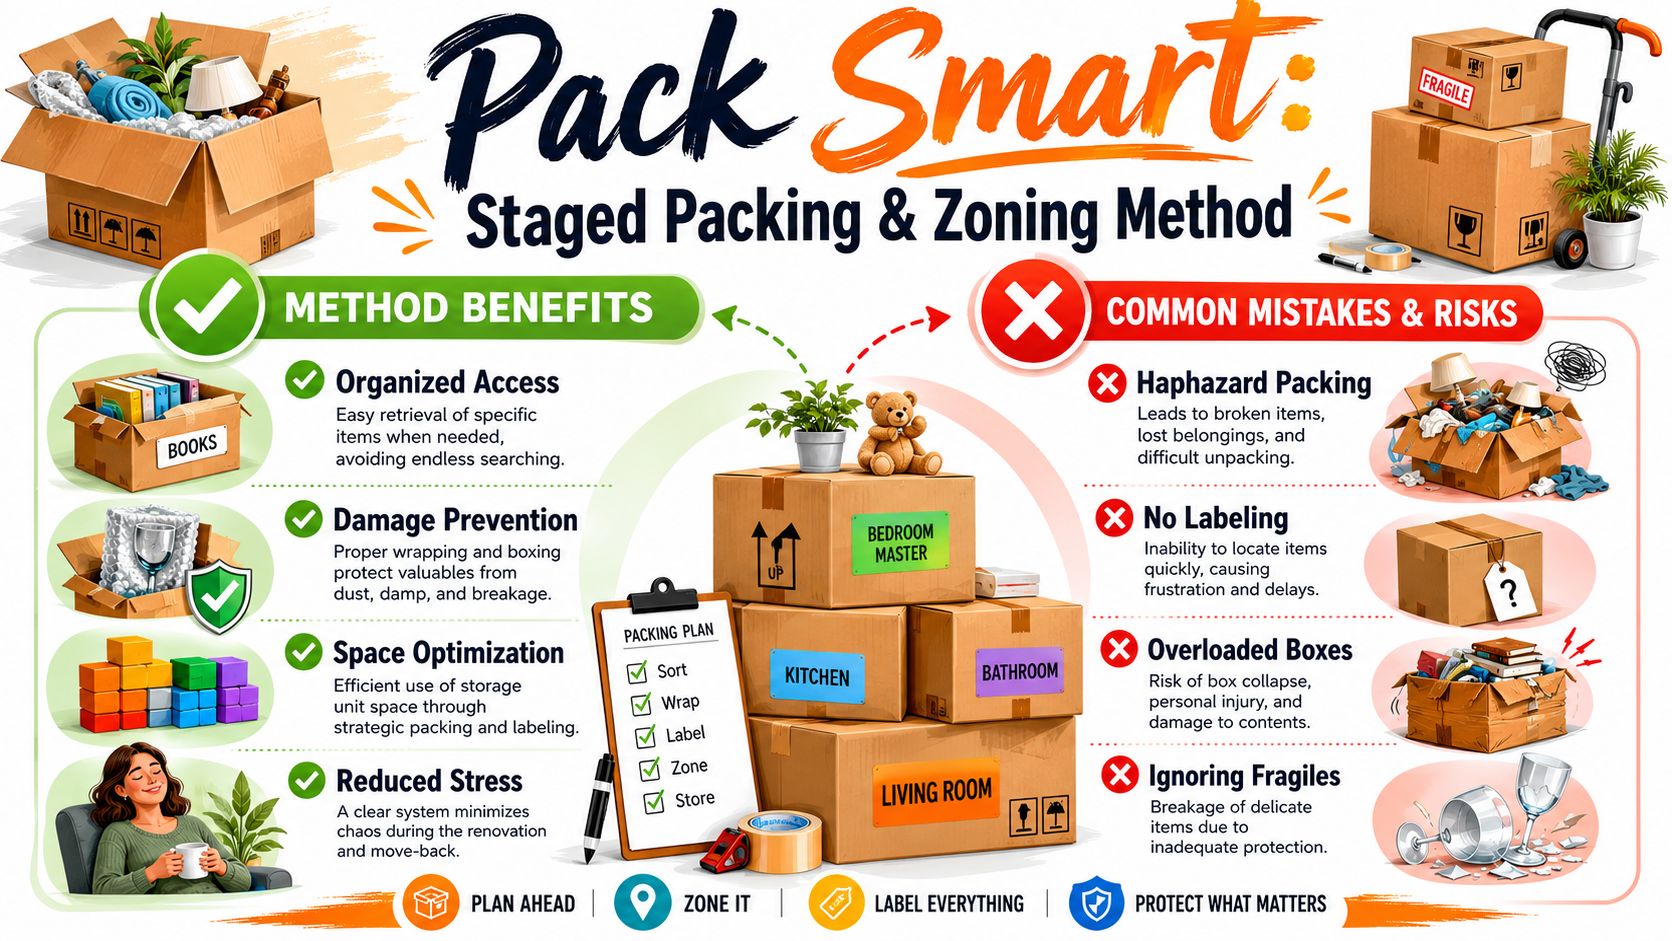
Pack by renovation stage first
This is the step householders often miss.
Before packing, split everything into four groups:
- Demolition stage. Items that must leave first, such as soft furnishings, wall art, rugs, and anything vulnerable to dust.
- Fitting stage. Furniture and household contents that can stay packed until joinery, flooring, kitchens, or built-ins are finished.
- Decorating stage. Items you will want back soon after painting, such as curtains, lamps, bedside tables, and lighter room accessories.
- Final return. Low-priority pieces, seasonal items, and anything decorative that can wait until the house is fully settled.
That phased approach saves a lot of rummaging. It also cuts the chance of dragging half the unit out because one box of curtain hooks was packed behind a wardrobe.
Use proper materials for the item, not whatever is lying around
Dust sheets and bin bags are fine on site. They are poor protection in storage.
Use double-walled boxes for heavier household items, smaller boxes for books and tools, and clean wrapping paper or bubble wrap for fragile pieces. Put plates upright, pad out gaps inside the box, and tape the base properly. Mirrors, artwork, and glass shelves need edge protection and should be stored upright, not laid flat under weight.
Furniture needs a bit of care too. Empty drawers, remove loose shelves, bag up fixings, and tape the fixings bag to the item it belongs to. Sofas and mattresses should go in breathable covers rather than airtight plastic if they may be stored for a while.
Label for retrieval, not just ownership
A box marked "bedroom" is too vague during a renovation.
Write three things on each box:
- the room
- the stage
- the priority
For example: "Main bedroom. Decorating stage. Open first."
That gives you a working system when the project shifts. If the plastering overruns or the painter wants another few days, you can still find what you need without opening six anonymous cartons. For practical examples, this guide to packing when moving house is useful because the labelling habits carry over well to renovation storage.
Stack for safety and access
The basic rules are simple, but they matter.
- Put heavy boxes low down
- Keep fragile cartons above solid ones
- Stand furniture upright if it is designed to bear weight that way
- Leave a clear path to the back
- Keep frequently needed boxes near the front
- Avoid loose bags that slump, split, and trap moisture
I also recommend keeping one small "return first" zone by the door of the unit. That area is for the kettle, basic cookware, bedding, school items, chargers, and anything else that helps you function while one part of the house comes back into use.
If you want another practical example of how transport and storage planning overlap on bigger jobs, this overview of Perth removals and storage shows the same principle. Packing works best when it matches the order the job will run, not just the order items left the house.
Avoid the overfilled-unit mistake
Trying to squeeze everything into the smallest possible space usually causes more damage than it saves in rent. Boxes get crushed, labels disappear from view, and every visit turns into a reshuffle.
A renovation unit should work like a storeroom, not a sealed container. If you cannot reach the boxes for the next phase without unloading the front half, the packing plan needs work.
Done properly, the unit supports the build. Demolition items go in first, fitting-stage contents stay protected in the middle, and decorating-stage boxes sit where you can get to them fast. That is what keeps belongings safer and the renovation less stressful.
Managing Costs and Ensuring Security
Cost worries are usually about uncertainty, not just price. Renovations slip. Deliveries move. A room that was meant to be finished this month may still be waiting on a final trade next month. That's why flexible storage tends to suit renovation work better than rigid arrangements.
The main cost trade-off is simple. A unit that's slightly too small can create handling problems, increase the chance of damage, and waste your time every time you need something. A unit with sensible working space is easier to organise and often better value in practice because it keeps the job running smoothly.
Where costs creep up
Most avoidable expense comes from poor planning rather than the storage itself.
Watch for these pressure points:
- Double handling when items are moved from room to room before eventually going into storage
- Late packing that leads to buying materials in a rush
- Keeping low-value clutter that should have been donated or disposed of before the move
- Poor access planning that means repeated visits because the wrong things were packed too deep
Insurance deserves attention too. Don't assume your home contents policy automatically covers belongings once they're off-site. Check the wording, ask direct questions, and confirm what applies to items in storage during building works.
Security starts at home. Before work begins, it's worth reviewing basic property protection as well as your off-site arrangements. These Networking2000 home security tips are focused on CCTV, but they're a helpful reminder to think about access, visibility, and vulnerable entry points while your house is disrupted.
What good storage security should include
You don't need marketing language. You need clear practical safeguards.
Look for:
- 24/7 CCTV monitoring across the site
- Controlled access so entry isn't open to the public
- Individual unit protection where available
- Clean, dry conditions that help protect furniture, documents and fabrics
- Straightforward support if your timeline changes or you need to adjust your booking
The security side and the packing side work together. A well-run facility helps protect your items from outside risks. Good packing protects them inside the unit. You need both.
Booking Your Beeston Storage Unit in Minutes
Once you know what's leaving the house and when, booking should be the easy part. Keep it simple and book around the renovation schedule, not around the day the house becomes unbearable.
A straightforward booking process
- Go to the local branch page so you're looking at the right location and access details for Beeston self storage.
- Choose a likely unit size based on the contents you're moving off-site, not just the number of rooms in the house.
- Pick your start date a little before demolition or heavy works begin. That gives you time to load properly without rushing.
- Complete the reservation form with your contact details and any timing notes that matter.
- Confirm access and move-in arrangements so you know what to bring on the day and how the first visit works.
A quick visual helps if you haven't booked online before.

One last booking tip
Book when the renovation is still on paper, not when the first room is already in chaos. That gives you time to sort properly, protect fragile items, and load the unit in a way that still makes sense weeks later.
Good renovation storage doesn't just hide clutter. It gives the project space to breathe.
If you need a secure, flexible local option, Orange Box Self Storage makes it easy to book space for renovations in and around Beeston. Whether you're clearing one room or managing a phased whole-house project, the right unit can protect your belongings and make the work at home far less stressful.